|

You've only read
Lord of the Rings.
We live it! 

Pictures
Where
is Dagorhir?
Announcements

Battles
Practices
Directions

Dagorhir Rules
Dagorhir Handbook
"How To"
Pages
Bulletin Board
Join
Mailing List

Aratari Units
National
Site
Reference Links
Web Rings
Guest
Book
Info
Board
301-231-3594
Dagorhir Info Line

Dagorhir:
Please vote!
| |

What is Dagorhir?
Forming a Unit
Aratari Units in the DC Area
Where Are Other Units?
Dagorhir Rules
Dagorhir Aratari Handbook
Battle Pictures
"How To" Pages

Announcements
Battles & Upcoming Events
Practices & Directions
Event Directions
Aratari Information Line:
301-231-3594

Join Aratari's Mailing List!
Dagorhir's National Website
Join our National Community
on the Dagorhir Bulletin
Board


|

Building a Dagorhir Javelin
This should work for both PVC and fiberglass cores. The illustrations show fiberglass core.
Special thanks to the Dagorhir
Romans
for their contribution in developing these instructions and graphics. While this design
is not the only one allowed or in use, it is a recognized standard highly recommended
for safety and longevity.
YOU WILL NEED:
1 5’ x ˝" Fiberglass Rod (Golf course flag poles are perfect)
2 3" x 1" x ˝" sections of Closed Cell Foam
2 9" x 4" x 2" pieces of Open Cell Foam
1 12" x 4" x 2" piece of Open Cell Foam (I recommend Computer Packing Foam)
4 3’ lengths of Pipe Insulation
2 12" squares of Yellow and Black Fabric for covers
Roll of Duct Tape (duh!)
1 Exacto Knife with a new razor blade
1 Can of Weldswood Contact Cement (optional)
2 12" square Black and Yellow Fabric for covers
|
Once you have gathered the necessary materials, you are ready to begin.
Wrap the ends of your fiberglass rod with duct tape. Taping a penny across
the tip is a good idea too, as it increases the surface area of the tip.
This helps distribute kinetic energy and also helps keep the tip from
poking through. This helps to prevent it from pushing through the foam
later. A javelin is essentially a giant arrow. Build it with the same
stringent safety criteria.
Then cut your two pieces of Closed Cell foam into roughly diamond
shapes and apply them to both ends with duct tape as demonstrated in
Figure 1 on the right.
|
Figure 1
|
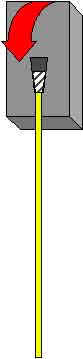
Figure 2
|
In Step two, you will be applying the smaller sections of Open Cell
Foam to both ends of your javelin. I highly recommend that you use
2" thick computer
packing foam. It lasts much longer and never gets that squishy quality
that standard upholstery foams degrade into. The trick to constructing
a safe javelin is in the application of the Open Cell Foam. NEVER pull
down on the foam. You want to gently fold it up and over the tip of
the javelin, as demonstrated in Figure 2.
Figure 3 details how the
duct tape should be used to secure the first layer of your Open Cell
Foam. ALWAYS start wrapping at the bottom (where the foam meets the
rod). It helps to have someone hold the foam in place for you when you
start. Working from the bottom bunches the foam towards the tip to
protect your opponent.. That’s good! Remember, someone might throw
it back at you!
|

Figure 3
|
Wrap the foam tightly with duct tape, just past the fiberglass core.
See that section of white in Figure 3? It is right between the
dark gray of the Closed Cell foam and the lighter gray of the Open Cell.
This is not a mistake in the graphic. There should be a tiny gap there as
the result of wrapping from the bottom. That’s perfect, provided the
tip doesn’t move back and forth appreciably. Repeat this step for
both ends of the javelin
|
Your final step in the process of constructing your safe javelin
tip is to apply the last layer of Open Cell foam over the safest
end. Remember to gently
fold the Open Cell foam up and over the tip. This step is basically
identical to the previous one, except that this piece of Open Cell
foam must be considerably longer in order to cover the previous
layer and still extend down to fiberglass rod. As before, wrap the
duct tape tightly from the core up. The duct tape will extend well
past the position of the core. As displayed in Figure 4, the duct
tape should extend almost to the top of the previous layer of Open
Cell foam, but not beyond it. Again this method of wrapping from the
bottom forces the foam to bunch at the top. This ensures the key to
safety. That key, to coin an old Dagorhir expression, is PROGRESSIVE
RESISTANCE. This means that the foam layers become increasingly firm
as you press towards the core.
Having completed the tip, you are ready to pad the shaft. Use
the pipe insulation for this. Measure the length to fit. Pipe
insulation is 3’ long, so you'll need two pieces to completely
cover the javelin's shaft. A second layer of pipe insulation along the shaft makes it safer and
longer lasting. I recommend that you cut a slice out of the first
layer and actually glue it to the fiberglass core. Why? It keeps the
foam from sliding back and forth and increases your control over the
entire length. Cover each layer with duct tape, and secure it to the
tip and butt.
|
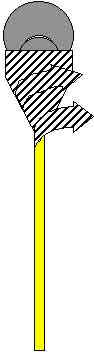
Figure 4
|
Once this is achieved, you are ready to cover both ends in cloth.
Dagorhir has a rule that the striking tip must be covered in bright
yellow cloth for easy identification, and this rule has been strictly
enforced in recent years by Dagorhir's very conscientious Weapons Checkers.
Cover the butt in black or gray cloth so as to prevent someone hurling the
wrong end first. Write your name on the yellow tip so that you
(and your opponents!) know which javelin is yours.
Your javelin must not weight more than 1.5 pounds.
|
... and remember to throw gently when at a close distance.
National rules also require that you throw from farther away than the javelin's total length.
Check your javelin regularly.
Any comments or questions? Please
email me. I would appreciate any input. -
Dominus
|
|